Showing posts with label PORTFOLIO BUILDING. Show all posts

Saturday, 28 October 2017

LAUN603, EXTENDED PRACTISE, STUDY TASK 2c, PORTFOLIO BUILDING, LIVE BRIEF - 3, PRODUCTION

PRODUCTION OF BUG
AND FINAL FILM

Okay this is going to be picture based and not too much waffle about technical things just a brief story of how I made this loop.

car in viewport with green screen

solo rigged arms only as that was all I needed

lighting was all achieved using portals! basically a road hdri map attached to a dome rotating to create reflections on the car bonnet, and then a separate global light which is forced through portals into the car windows as can be scene in picture indicated by red boxes. This eliminates and random light that should not be inside the car or in scene, it gives us actual daylight coming through the windows and only that. (they look like area lights they are not the are Ai light portals)

bug rig placed on glass windscreen, this will be rendered out in an isolated fashion for comping.

Compositing

Loads of work here but brief list of what went on...
  1. Match grain used to blend in the maya renders to the film footage
  2. Legacy blur used to soften render edges
  3. Motion blur used with legacy blur to bed everything together
  4. Tons of colour grading on all layers
  5. Key light used on green screen elements
  6. Masks used on footage to create wing mirror reflections
  7. Footage re time mapped to speed up
  8. Jiggle expressions used to add movement to car
The main footage plate had to be 3d enable to move in the y axis so I could get the horizon line where I needed it in relation to the car.
The footage was then duplicated flipped and revers mapped so I could pout it int he wing mirrors! its real subtle but if you look close you will see the reflection is a frame behind the main footage and in reverse so it gives the illusion of the main footage been shown going into the distance in a mirror reflection. All compositing here is subtle but when put together as  whole makes it all bind together.


Things like the little textured sign I made and understanding of glass refractions and how to use alpha masks in Al and use of lighting are all key skills to take into my final extended film.

Here is a breakdown of the film compositing from my showreel 


VFX Breakdown of "BUG" from craig potterton on Vimeo.

Here is the final Loop submission


"BUG" from craig potterton on Vimeo.

LAUN603, EXTENDED PRACTISE, STUDY TASK 2c, PORTFOLIO BUILDING, LIVE BRIEF - 3, IDEA

loop de loop
"BUG"

For this loop continuing on with my theme of only doing things I can use on my showreel and not wasting time doing pointless gifs I chose to make this loop about trying to mix up my compositing skills and maya skills in a way that they both compliment each other.
Going all hollywood on myself I decided to ty out using green screens in maya and ten using key light to get rid of them in compositing, thus giving me the ability to render certain elements of my maya scene like skin surfaces with really high SSS samples but not have to waste hours rendering other things that do not need this many samples. Yes I have rendered things in layers to help along with this which is the easy route to rendering out complex scenes in maya but the whole point of this is that a-lot of the studios I dream to work for composite everything with green screens workflow, all the movies I love are all made using extensive green screening so it makes sense for me to practise the skills it take to be able to use a combination of them and maya together.

The Idea

Its a simple one guys, a bug on a car windscreen holding a sign saying been a bug sucks! but in true old school hollywood style I want to put in some car footage that moves about looking dare I say it really shit on purpose! Obviously there will be a-lot of work as in technical skills to blend these together but I still want it to look like the old school films where the footage is comped in on the car windscreen.


LAUN603, EXTENDED PRACTISE, STUDY TASK 2b, PORTFOLIO BUILDING, LIVE BRIEF - 2, PRODUCTION

Portfolio building animation

LOOP DE LOOP
BRIEF WORD
LUCKY

Production

Without boring anyone with hours of me prattling on about things I find exciting in maya that others probably don't, here is a brief summary of the production and what I have learnt..

Dynamic Curves

I was struggling to get my hair to properly collide with my meshes even when my meshes were converted to collision objects/colliders, after playing about I found when I was creating my curves that maya default added 5 cv points of each curve which in the relation of the long hair strands bending around a curved complex object simply was not enough cvs so I increased this to 20 per strand and it instantly solved the problem. I am mentioning this as there was no literature anywhere about this and the setting was hidden in a none obvious place in maya, so I ended up emailing the autodesk Q&A and got a good answer back from their senior xgen technical guy, I so was pleased with the response and also my own investigation to a solution to a problem that has been driving me nuts for weeks.  Sometimes you just have to dig.
Below is a clip of me driving my dogs xgen hair with the curves set to a bright colour so you can see the input attractions that each one draws on the hair and how it works. The hardest part in all of this is getting the damp and motion drag at the correct levels as again there is no set amounts or literature to how to set literally hundreds of options so it pure trial and error and sometimes frustrating as the slowdown even when cached is quite severe when driving so many curves all over the dog.


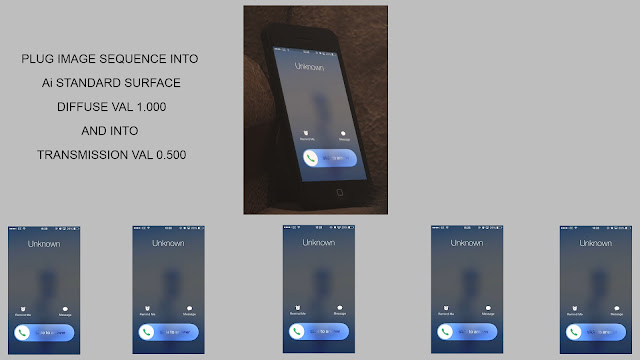
IMAGE PLANE FOOTAGE FOR THE PHONE

As for the mobile phone its not a mystery how to get footage onto a poly plane in maya using image sequences to texture a model so I wont prattle on about that but just thought id share anyone wanting to make a scene with love footage on using arnold then a trick I worked out was to plug the same image sequence into the transmission attribute of the shader and increase to about 0.500 as well as having the standard plug in to the diffuse for the basic footage! the transmission as you would presume makes the surface transmit light yet with the image sequence plugged in and to slightly overexposed then it makes the surface glow the footage from the diffuse giving a really convincing glowing phone or tv screen. As for the phone ringing footage it was just stock I took off youtube and then re sized in after effects to phone screen aspect ratio and then exported as image sequence.
A very subtle effect and you have to look close to see the phone slider ringing and the slight movement on the screen. I feel it is little subtle things like this that can really finish off an animation and just give it that final edge.

AS EXPLAINED BELOW IN MY CRAP INFOGRAPHIC : D


PLAYBLASTS

Below a trial run playblast of some animation set on the dog with all my hair settings refined, driving xgen hair demands lots of playblasts and test as you simply cannot get real time playback in your viewport so this process is essential and regular in creation.

I created sound in premiere then used that attached to my maya time slider to sync my dog barking and growling body wiggles to the intended track to be used.


Here is my final film rendered out with relatively high sub surface sampling and also high diffuse sampling to reduce noise on my hairs and especially in the volumetric scattering which gets pretty noisy when lots of lighting is used. I am very happy with the fine balance I got between high quality renders but also reasonable render times. These frames took approximately 12-15 mins per frame running on an 8 core workstation. The subtle lighting and atmosphere I created in the scene worked with the centre solo chair I think really focusing on the main object which is the dog the leading the eye to the phone. Good 3 point lighting and creating a well lit scene using light and shadow blockers and some Gobos on my lights to focus attention where I wanted really helped to get rid of that over clean plastic 3d look I have grown to hate. In a nutshell the old movie tricks of the hollywood golden era of how to set up and light a scene are more important in the modern era than we choose to 
remember, and something I am focusing a lot of my spare time reading and research to.

As for the hair dynamics not perfect but a good step in the correct direction and a huge huge help im my animation of my final extended film. Things in maya are beginning to feel more fluid for me and intuitive and a lot more fun these days.

LUCKY


"LUCKY" from craig potterton on Vimeo.

CONCLUSIONS

This process was purely to test my rig before paying for rendering on my final extended, but more importantly I feel these short competitions are a great way to use my models and rigs for promoting myself and my work online, when I put my so much work into these assets I feel I should expose them in as many places as possible. As for the dynamics 0

LAUN603, EXTENDED PRACTISE, STUDY TASK 2b, PORTFOLIO BUILDING, LIVE BRIEF - 2, IDEA

Portfolio building animation

LOOP DE LOOP
BRIEF WORD
LUCKY

For this brief I thought it prudent to combine my projects and try make use of any opportunity to problem solve and learn new processes which can be used in my major project. And as previously stated I do not see any point in churning out quick poor quality animations to pack out a showreel with as that is the complete opposite of what all advise on showreels tells me that I have researched heavily the past few months, the professionals say less quantity and more quality and so that is what I am aiming at. This all been said here is my idea or plan....

U have taken my puddin model that was part ready for my major film and spent some serious stime refining the process of driving all the xgen hairs with dynamic curves, and refining the key framing. Alos expanding my knowledge of lighting and rendering using volumetric scattering to create atmosphere, but more importantly this test was me getting familiar and ready for animating for my final film and having a clean workflow for the dynamic hair.

I took my model and adjusted elements of it and re shaded the primitives and other adjustments to the rig, I then placed her on a worn armchair and imported one of my hand rigs iI had made for my silas model and just re shaded it again to fit this scene. 

Inspiration

On researching the word lucky on google for ideas I stumbled across a famous phrase from Clint eastwood that is from a Dirty harry film which I know and love since I was young. The line is
 "so the question you go to ask yourself is....do you feel lucky punk"
This in mind and having decided I wanted to use my dog rig somehow on seeing my mobile next to me the idea just popped into my head to have a hand reaching for a mobile phone that isd ringing and the small angry looking dog is sat growling and twitching and then when the hand gets close it yaps and barks and the hand jerks away, and as this is a looping film it then nicely allows the dog to resettle keep growling and the hand come back in and the bark re initiate and so forth repeating.
The opening to the animation is a freeze card screen with the words of the quote and then it flows into the film leaving the viewer under the knowledge that it is asking the do you feel lucky to the person who is trying to reach for the phone behind the dog in the chair.
I find this humerus and sharp and more importantly will allow me to refine and learn new skills in animating hair and movement combined and also rendering techniques, and most importantly still giving me a high quality animation that is short and humorous for my showreel.

Here is the rig set up in the chair with the phone, in the next production blog I will show a few production details and the final film.


Friday, 20 October 2017

LAUN603, EXTENDED PRACTISE, STUDY TASK 2a, PORTFOLIO BUILDING, LIVE BRIEF - 1, PRODUCTION


STUDY TASK - 2a

LOOP DE LOOP ANIMATION
"LOVE IS LOVE"
PRODUCTION


My focus with this animation is to enhance and refine my skills in the following....


  • LIGHTING
  • RENDERING
  • LAYOUT
  • MODELLING
  • MOTION CAPTURE
  • TEXTURING - SHADING
I simply do not have time to start rigging for such a short brief, and as this is meant to be a prelude to my larger extended work then I need to focus on what processes I am new to and want to refine before my major project. This animation is about refining techniques and processes and more importantly making content for my showreel that emphasis and shows off what areas I want to work in.


SILHOUTTES - ANIMATION


I drew my characters in PS on my cintique, splitting them into layers to enable 
puppet animation with them in Ae.


I took them into Ae and animated each one and then pre comped them 

all together into one big panorama


I used various lighting effects in Ae to back light the individual windows


Each window has a repeating >loop out expression on it.

MAYA MODELLING, LIGHTING

I made visible the silhouettes video in the reflection of the train window.


CHARACTER ANIMATION - Motion Capture


I got my rig from a contact on the cg meetup society I am in. After placing her in the scene I proceeded to my motion capture stage.


I THEN SET MY CHARACTER UP IN MAYA MATCHING ALL THE CONTROLS TO THAT OF MY FOOTAGE FROM THE ANALYZER 


I THEN RE TARGETED THE ANIMATION CREATING POSES ON MY RIG TO THOSE OF MY FACE ON THE IMPORTED FOOTAGE WINDOW IN MAYA


LIGHTING AND RENDER TESTS


Here as some of my many play blasts during animation whilst I was trying to work things out

HERE IS THE LOOPING FOOTAGE FROM AE FOR THE WINDOWS


PRE FINAL COMPOSITING EVALUATION


I have furthered developed my skills in

  • RE TARGETING MOTION CAPTURE DATA ONTO A RIG
  • CREATING GOOD LIGHTING EFFECTS IN MAYA
  • PLANNING LAYOUT OF A SCENE
  • SPARING USE OF ASSETT CREATION
  • EVALUATING RENDER TIME SCALES
In a nutshell this project has enhanced all of the key factors that I will need to make my final extended film, most importantly layout and lighting and set construction.

FINAL FILM


Thursday, 12 October 2017

LAUN603, EXTENDED PRACTISE, STUDY TASK 2a, PORTFOLIO BUILDING, LIVE BRIEF - 1, IDEA

STUDY TASK - 2a

LOOP DE LOOP ANIMATION
"LOVE IS LOVE"
IDEA GENERATION

INSPIRATION

For this task my inspiration came from a strange place and led me in a direction I was not expecting, yet un knowingly it kind of ties together all of current COP research and comes from where my mind is right now. I was watching Ted talks as this is a bit of a hobby for me and watched a lady called "Beatrice Coron" present a short talk about her career as a paper cutter, now the reason this sparked my interest was her overall massive emphasis on what she say coins the phrase "a language of storytelling". Purely using Silhouettes cut from paper she narrates a wonderful fantastical story through vast city scapes all cut from paper.


MY IDEA


I read a quote saying.....

“There are as many forms of love as there are moments in time.”

Giving me the idea to create a train and in the window reflection a city scape of sorts and in each window as in the paper cutting have a small slice of life in what is happening behind that closed door, telling a narrative as the camera moves across all of these windows showing that love is truly love and nothing can stop it, we can judge it but we can stop true love.

IDEAS FOR THE PEOPLE WITH THEIR LOVES (SOME FUNNY)


  • WOMAN WHIPPING A MAN
  • MAN AND WOMAN KISSING
  • MAN EATING A JAR OF MARMITE
  • MAN THROWING MONEY IN AIR
  • MAN OR WOMAN STABBING OR KILLING SOMEONE
  • PERSON PRAYING 
  • FAMILY ARGUING
  • DEVIL LOVE
  • DEPRESSION LOVE (HANGING)
  • CAT OR PET LOVE
  • FRIENDS LOVE (HOUSE PARTY) (DISCO)
  • TELEVISION OR FILM LOVE


COUNT 283