Friday 10 November 2017

LAUN603, EXTENDED PRACTISE, STUDY TASK 1, PRE EVALUATION, PROBLEMS, FAILURES, LEARNING OUTCOMES

PRE FINAL EVALUATION

This blog will address some of the many issues I have encountered in the production of this work, resolutions, and a general overview of the many hurdles I have encountered and learnt valuable lessons from.

XGEN HAIR/FEATHERS

To be clear the maya 2018 update is great as far as using xgen and I found it relatively easy for general purposes ie the actual grooming and shading. The issues that have dumb founded me are you cannot scale the interactive groom splines once applied to your model. As much as I tried to work to scale throughout the project when making multiple characters and sets for the first time on a large scale I was not always going to get it perfect and so the inability to scale my rigs into my scenes caused massive headaches and a complete re evaluation of how I am going to animate this film when I cannot even get my rigs into the same scenes and to scale! the only option is to re groom all the hair and then re do all of the dynamics curves attached to these splines on the resized characters! This is a monumental task and can only be approached after hand in. 

IN A NUTSHELL WHEN ALL OF YOUR SCENES INCLUDE MULTIPLE CHARACTER INTERACTION AND YOU CANNOT PUT THESE CHaRACTERS IN THE SAME SCENE WELL IT IS A MAJOR LOGISTICAl BALL ACHE!

XGEN UN BINDING FROM MESH MID ANIMATION 

This is a bug that has drove me insane as basically I have spent days re tar-getting motion capture onto my rigs to then be hit mid scene animation with the xgen deciding its had enough and not following my rig. This is something I have spoken with Autodesk xgen specialist about and it is a bug they are investigating and he had no answer even after looking at my rig I sent him. Just another thing that killed my last min rush to try and animate, but I investigated it well and on finding no resolution I cleaned up the whole way I bring my models into my scenes and have started using referencing of my main character rigs into my scenes, everything is locked off and frozen out on these clean referenced rigs and all I have is my controllers, this approach is starting to give me way cleaner results and less errors from the xgen, its a studio way of working this referencing in rigs and making sure assets are all clean etc but again all new to me so 
another lesson learned.

SOLID ANGLE ARNOLD LARGE PROJECT RENDER SUPPORT

A bit of a peeve here that I find out weeks from hand in that the paid render services I was intended to use do not support Arnold free from maya student version, and my only way of legally and in most cases of all I spoke to the only way anyone would do this job for me was with the purchase of a full Arnold license. It seems sadly ironic that you get full render support in maya for Arnold as there default ray based renderer, yet if you want to batch render, or send it to a render farm you have to stump up huge bucks for the privilege!
Workarounds for this are none existent for me as every single thing I have done on my scenes is with Arnold shaders, Arnold lightning, and using Arnold per object sub division. Basically the option to render using mental ray is out the window and thus I am left with my own pcs at home only! transference of scenes and characters with so many texture files and bump or displace files attached to them is a logistical nightmare tbh and would become an uncontrollable mess to try move these files to lets say the university and multi mac render them, its just not a workflow that will work for me. So now I am going forward looking at all lighting and textures and looking at ways to speed render times, my main resolution to this is using Arnold AOV outputs on all my render tests per scene and adjusting sample rates across the board, looking at the AOV renders and isolating where I can drop sample rates and speed things up. This is what AOV is used for and is very useful but again time consuming for a one man band scenario.

problems, problems, problems

To work in maya you need a will of steel and the patience of a saint to even get through a day on the software! it just throws things at you constantly and once I hated this, yet now in some sick sense of the word I love it! It is challenging and exciting to work out all of these issues it throws at you and if you cant deal with these types of constant problem solving workflows then maya really is not for you! 

LACK OF ANIMATION

So animating has taken a back seat for me the last month due to all the work on the rigs and textures and some of the issues explained above, doe i regret this....NO! animating is fun and I have great passion for it, but not nearly as much passion as I do for the aesthetic and visual aspects of an animation, this been said I take it a personal challenge to get this film moving and animated in some shape or form....its just going to take a hell 
of a lot more time than anticipated.


LAUN603, EXTENDED PRACTISE, STUDY TASK 1, LIGHTING

LIGHTING

For this blog I am just picking a few examples of how I constructed sets and then lit them, my workflow and construction of the scene. All of my character lighting is studio setup 3-5  point lighting pretty generic for people to research so not going to waffle on about it, the more interesting stuff I will re cap briefly here.

EARLY MORNING OR EARLY EVENING OUTDOOR COTTAGE SHOT

For this lightning setup I wanted to real utilise volumetric to create an almost eery mystical feel to the secluded cottage in the middle of the woods. 

FIRST I USED SPOTS BUT ATTACHED GOBOS TO THEM WITH MESH FILTERS AND ALSO UTILISED TEMPERATURE ON THE BULB TO SEND OUT LIGHT STREAKS AS SEEN BELOW WITH REMOVAL OF MY SURROUNDING WOODLAND ASETTS. 

(IPR VIEWPORT)

I ATTACHED A PHYSICAL SKY SHADER TO A DOME LIGHT TO CREATE  A SUN SETTING OR RISING EFFECT WHICH I COULD CONTROL THE SUNS HEIGHT ON AND ALSO THE ATMOSPHERIC DUST AND HAZE IT CREATES AS SEEN BELOW IN THE BLEND ON THE HORIZON LINE

 (IPR VIEWPORT)

IN ADDITION TO THE ABOVE I HAD TO USE DIRECTIONAL LIGHTING TO CREATE SOME SURFACE LIGHTING ON THE COTTAGE ITSELF SO IT DID NOT GET LOST IN THE HAZE, I ALSO HAD TO INTERNALLY LIGHT IT WITH POINT LIGHTS AND THEN WITH MESH LIGHTS FOR BEHIND THE FROSTED WINDOW GLASS. THERE ARE ADDITIONAL LIGHTS ABOVE THE TREE CANOPY FOR SHADOW CREATION AND ALSO OBJECT BASED MESH LIGHTS ALLOCATED  AT FOCUS POINTS OF THE SCENE. ALL IN ALL THE SCENE UTILISES 17 LIGHTS INCLUDING THE PHYSICAL SKY AND VOLUMETRIC BASED LIGHTING. A LARGE ARRAY OF LIGHT BLOCKERS HAS ALSO BEEN USED TO DISPERSE SHADOWS WHERE I NEEDED THEM.

THE LIGHTING GIVES ME FULL CONTROL OF DAY OR NIGHT AND ALSO ENVIRONMENTAL CONTROL OF AIR TYPE AND DENSITY, BASICALLY I CAN ANIMATE ANY SCENE WITH THIS SET JUST BY ADJUSTING THE INDIVIDUAL SETTINGS OF EACH LIGHT WHICH IS PRECISELY NAMED AND ORGANISED IN GROUPS IN THE OUTLINER EG. CANOPY LIGHTS - SKY - HOUSE - LOW LEVEL - OBJECT_BASED....ETC ETC BASICALLY A CLEAN SET UPFOR ME TO USE FOR VARIOUS SCENES.


INDOOR COTTAGE SCENE

For this scene I utilised light portals, this technique creates some dramatic effects, in a nutshell I am creating outdoor lighting as in environmental lighting but then creating a portal into the interior scene where this light can enter. The beauty of this method is that no light can enter the scene from any angle or though any surface but through the portal itself, negating the need t create light blockers or using big domes to stop light flooding into the scene or any other number of ways to block escaping light from large natural light sources like skies. This method allowed me to get all the benefits of a physical sky yet the ability to direct it where I wanted. As for any other lighting in the scene I created per object mesh lights to crate subtle glows. In my final animation the fire is an emitter with dynamic properties, and the water is a container with an emitter inside within the cauldron again dynamic, but for these stills I have used mash nodes to create my water and bubbles and displacement shaders I made for the water surface. 


 BELOW  YOU CAN SEE HOW I CUT A HOLE IN A POLY WALL THAT IS NOT VISIBLE IN THE SCENE AND THEN PLACED A LIGHT PORTAL BEHIND THIS, I THEN ADDED A SPOT WITH VOLUMETRIC TO EMPHASISE THE LIGHT LEAKING INTO THE ROOM FROM THE WINDOW. THE LEVELS OF MY FAKE NATURAL SUNLIGHT CAN BE CONTROLLED EASILY THROUGH THE LIGHT PORTAL SETTINGS AND I CAN GO FROM DAY TO NIGHT VERY QUICK AND SIMPLY.

CHARACTER LIGHTING

No real tricks here just using photography tutorials on how to create good studio lighting, I would say 3 point but most these days are 5 point.

EXAMPLE RENDERS


LAUN603, EXTENDED PRACTISE, STUDY TASK 1, TESTING FOR SHADERS, TEXTURES

CREATING SKIN SHADERS USING DISPLACEMENT MAPS AND SUB SURFACE SCATTERING

My purpose for this research is to get my head around building my own shaders, especially using displacement maps and sub surface layers. To help me create my skin surface for my sausage character for my rig. Starting on basic skin I feel is the best approach and then once I have perfected it move onto my
sausage texture for my model.


First I got hold of lots of deep scan data from "infinite realities" including displacement maps and specular roughness map.


Displacement map

Map I used for Specular roughness


Then it was a case of about 2 hours in maya fiddling about with the Arnold standard surface shader. My huge improvement here is my ability to use the Hypershade window to good effect, previously I bumbled around in the attribute editor but now I have got my head around the hypershade I find it a complete revelation as it is just so easy to see the network of nodes I am are creating, and it is a really methodical visual way of working.

I did 7 major passes over my model to create my final skin shader and so threw them in after effects to make it a better visual way to see the stages in a little video.


In reflection it is not perfect but I am very happy with the displacement and it has opened up a lot of options for me to add the wrinkles and pitting needed for my sausage skin, also
building my surface in layers which will be invaluable for my sausage 
meat sub surface variations.

THIS IS A GUIDE I USE FOR SKIN CREATION IT IS A HANDY REFERENCE CHECKER
And now for a quick sausage modelling 
and shading experiment

In this exercise I did not waste time getting UV map seams perfect, and I modelled the sausage in 10 minutes, it was purely a trial about making my own textures in Ps and applying them to a standard surface shader and playing about with the parameters to see what layered effect I could create. I am very happy with the blood like effect coming from the deep sub surface layer, and dare I say it the maggots in the flesh appeal to me too. There is a lot from this few hours experimenting process that I can confidently take into my final modelling process for my character.
SHADERS FOR BIRD CHARACTERS

HERE IS JUST A SMALL COLLECTION OF THE SHADERS, UV MAPS, BUMP MAPS, DISPLACEMENT MAPS, ETC THAT I HAVE MADE TO USE BE 
USED ON MY BIRD MODELS. 

ALL OF MY UV MAPS ARE MADE BY MYSELF IN PHOTOSHOP USING SOFT BRUSHES AND GRADIENT OVERLAYS.


EYE UV MAPS

BEAK VECTOR DISPLACEMENT MAPS


EYE CONTOUR UV MAP
BUTTON BUMP MAPS


SKIN BUMP MAPS


 EYE UV MAP


BEAK WITH LIPSTICK UV MAP


EYE CONTOUR UV MAP
EYE BUMP MAP


BOW UV AND BUMP MAP


EYE UV


SKIN CRACK DISPLACEMENT MAP


EYE CONTOUR BUMP MAP
FABRIC BUMP MAP


SKIN BUMP MAP


FABRIC DISPLACEMENT MAP


SSS SKIN UV MAP

DIFFUSE SKIN UV SHADER

SACK UV MAP

 SACK DISPLACEMENT MAP
 SACK ALPHA MASK
ATTACHED TO ARNOLD OPACITY VALUE NODE TO MASK OPACITY 
OF BELOW SHADER TO CREATE FRAYED EDGES AS SEEN BELOW


STOP TO THIS BLOG

Through speaking with tutors on the content of this production blog and its subsequent size I am stopping this textures and shaders blog here before it gets out of hand in its size.
Lets just say there are hundreds more images like these as I have made, tried, tested, and used hundreds of textures and shaders on this project.


LAUN603, EXTENDED PRACTISE, STUDY TASK 1, SHOT LAYOUT

PRE-VIS LAYOUT

A lot of my pre vis layout was a combination between layout and using dummy models of my rigs for size guides within my scenes, I made duplicate meshes and keep then named in a layer as size guides in all of my environment scenes, this way I could use my storyboards to set my characters and cameras up to reflect the story boarded scene, but also ensure correct sizing and layout. This pre vis version of layout is very useful to me as when I am ready to animate all I have to do is import the working rig and place it in the same scale and position as the stand in model and I am ready to go, it is also handy to test render just to see how shadows react to the characters in the planned positions etc, basically it gives me a real overview of how each shot will not only look through a camera, but also how it will look in final render pass..


(THIS SET IS GIANT BUT ACCOMMODATES 12 DIFFERENT SCENES SHOT FROM DIFFERENT ANGLES IN MY STORYBOARD)


LAUN603, EXTENDED PRACTISE, STUDY TASK 1, SETS, ENVIRONMENTS

ENVIRONMENTS MODELLING

my scenes have been meticulously planned out to the placement of all major assets and layout of the shots based on my storyboards. This been said I have hundreds of small assets that I am not going to sit down and draw as they are such easy 3D models to make, or more to the point they are models that I will make in a within maya fashion using reference pictures for shape and then making all my textures in photoshop there just is not value in me sitting and drawing a tomato or a sack when I can make a poly primitive cylinder in seconds grab some corner verts pull them out then unfold the uvs and throw a sack texture on in photoshop making a convincing sack for a background asset in a short space of time. as seen in this example below which was a 10 min model.

(all my small bg assets will have some fun elements or easter eggs whichever you want to call them as this is my animation and I have the freedom to do this now that I wouldn't have when working for a studio.

In reflection I could have spent 6 months just making sets and bg assets I enjoy it that much but in reality I have about 2 days for each set for each scene and so speed modelling and fast turn arounds mean I cannot be too precise or get bogged down with making them perfect they are just average builds.

*disclaimer all lighting is either basic dome lighting or spots just thrown in to see reaction of light on material it is not final lighting in any way shape or form so please don't judge on lighting at all as it is not part of this blog, this is merely showing progression of my set build in general, lighting will be approached on subsequent blogs.

SACKS


CLOCK


PICTURE WALL (MY PERSONAL FAVOURITE AS I MADE VINTAGE PHOTOS FROM RENDER TESTS FROM MY CHARACTERS AND WORK, ITS SUBTLE AS IN BG BUT THINGS LIKE THIS MAKE ME SMILE AND KEEP ME FOCUSED)


SHELVING UNIT WITH POTS


TABLE WITH FOOD (ALL BASIC LOW POLY PRIMITIVES WITH PS UV MAPS ON THEM)


WALLS AND FLOORS ARE FLAT POLY SURFACES THAT HAVE DISPLACEMENT MAPS ON THEM TO ENSURE SPEED IN THE SCENE IS NOT SLOWED DOWN


CAULDRON


HANGING RAGS MADE USING PS ALPHA MAPS


ALL THROUGH THE BG ASSETS CREATION AND LAYING THEM OUT IN THE SCENE I HAVE USED DUMMY MODELS OF MY CHARACTER MESHES TO ENABLE ME TO SIZE AND SCALE EVERYTHING CORRECTLY. THEY ARE USEFUL FOR RENDER TESTS TOO ALMOST LIKE A LAYOUT PRE PROCESS TO ENSURE WHEN IT COMES TO LAYOUT I CAN JUST DROP IN MY RIGGED CHARACTERS AND I KNOW THEY WILL FIT IN THE SCENE AND THE INTENDED PLANNED SHOT.


DUMMY MESHES USED FOR SIZING OF SETS


OUTDOOR COTTAGE SET

SO MANY ORGANIC ASSETS HERE GRASS TREES WOOD ETC ETC I AM NOT GOING TO SHOW INDIVIDUAL MODELS AS IT WILL GO ON FOREVER, LET'S JUST SAY IT WAS A GOOD FEW DAYS WORK PUTTING THIS ONE TOGETHER BUT AN ENJOYABLE AND EDUCATIONAL SCENE TO WORK ON. AND IN REALITY THE CREATION PROCESS WAS THE HARD WORK THE ACTUAL LAYOUT WAS UNDER A DAY DUE TO THE PROCESSES EXPLAINED BELOW.

Again the lighting I have used just simple thrown in lights to test textures it is not final pass diffuse lighting my any means so ignore the quality as it is low. As for the final lighting I have created an Aisky but then plugged it into a Aitransform node so I can control the height of the sunrise sunset etc and use physical sky attributes like mist and fog etc to create act real light bounces through the foliage. I am using turbidity and albedo settings as well as azimuth and elevation to allow for easy transfer from day to night in my scene just from adjusting these node settings.


TO REALLY EMPHASISE MY USE OF LOW POLY ASSETS AND WHAT I THINK IS A CLEVER USE OF SHADERS AND ALPHA MASKING HERE IS A SHADERLESS SHOT OF THE ABOVE SCENE NOTE THE LEAVES AND WALL PLANES ETC ALL LOW POLY AND JUST WELL I THINK WELL UV MAPPED AND AN EFFICIENT WAY OF WORKING ON A LARGE SCALE SCENE WITH MILLIONS OF ASSETS IN IT. AS YOU CAN TELL AM PRETTY PROUD OF THIS STUFF AND WELL IT FEELS LIKE I AM APPROACHING MAYA FROM A MORE PROFESSIONAL WORKFLOW AND VIEWPOINT THESE DAYS AND REALLY TRYING TO USE PROCESSES I KNOW STUDIOS WILL BE USING AND WILL WANT STAFF WHO KNOW HOW TO WORK IN THIS FASHION TO SAVE TIME AND MONEY. LESS BOTH FEET FIRST AND MORE PLANNING AND EDUCATED EFFICIENT WORKFLOWS IS MY MOTO THESE DAYS,


USING STAND IN MODELS AND THEN INSTANCING THEM USING MASH HAS ALLOWED ME TO CREATE THESE LARGE AREAS OF LOW POLY TREES AND GRASS, I HAVE ALSO USED LOTS OF ALPHA MASKS ON FLAT POLT PLANES TO CREATE LEAVES ETC ALL ALLOWING ME TO DENSELY POPULATE MY SCENE WITH MILLIONS OF ASSETS AND STILL HAVE IS USABLE AND ALSO RENDER AT DECENT SPEEDS. THIS PROCESS HAS BEEN HARD TO LEARN BUT AT THE SAME TIME ALLOWED ME TO CREATE SCENES I COULD NEVER HAVE DONE WITHOUT UTILISING THE STAND INS AND INSTANCING TECHNIQUES.
I HAVE LEARNT THAT WORKING IN MAYA VIEWPORT IT IS NOT ALL ABOUT WHAT YOU SEE IN FRONT OF YOU ITS ABOUT HAVING THE KNOWLEDGE TO BE ABLE TO POPULATE THINGS WITH BOUNDING BOXES AND WIREFRAMES HAVING TH CONFIDENCE THAT WHEN YOU HIT RENDER IT WILL BE WHAT YOU ARE AFTER. IT IS AN EXCITING PROCESS SEEING ALL OF YOUR GUIDE BOXES COME TO LIFE IN THE RENDER VIEW WINDOW.

HERE IS WHAT I AM WORKING WITH IN VIEWPORT PAY ATTENTION TO THE FACT I POPULATED THE NEAR GROUND TREES TO THE HOUSE WITH ACTUAL TREE MESHES SO I HAD FULL CONTROL OF THEM FOR CLOSE DETAIL AND THEN EVERYTHING AROUND WHERE STAND INS AND INSTANCED.

BELOW YOU CAN SEE ALL OF THE INDIVIDUAL BOUNDING BOXES FOR THE BG GRASS AND THE LARGER TREES.


FOR THE FOREGROUND GRASS I USED XGEN AND LEARNT HOW TO DRIVE A DESCRIPTION USING EXPRESSIONS AS OPPOSED TO GROOMING, THIS WAY I ONLY HAD TO MAKE A FEW PRIMITIVES AND THEN USED EXPRESSIONS TO SCATTER AND RANDOMISE THEM.  AGAIN THEY ARE IN FULL CLOSE UP CAMERA VIEW SO WANTED LOTS OF CONTROL OVER THEIR LOOK AND POSITION. THEY ARE AGAIN INSTANCED INTO THE SCENE AFTER CREATION TO SAVE RENDER SPEED.


WORKING THIS WAY IN WHERE I FOCUS HARD ON FOREGROUND COMPONENTS IN ACTUAL MESHES AND THEN USING INSTANCED OBJECTS FOR THE ELEMENTS IS A REVELATION FOR ME AND WILL BE INVALUABLE IN THE FUTURE FOR MY SET CREATIONS. IT IS TIME SAVING AND AlSO A GREAT WORKFLOW.

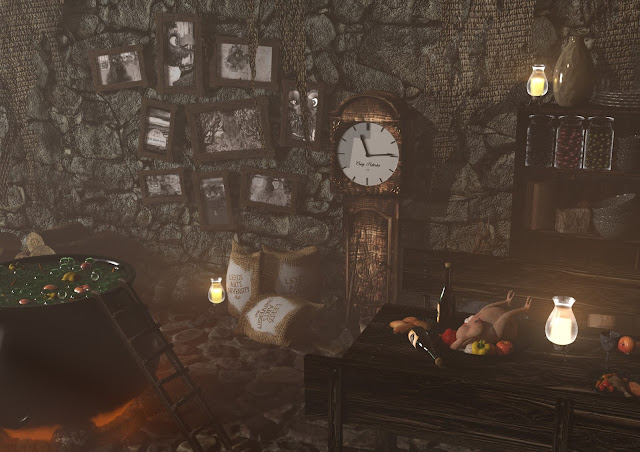
HERE IS A MORE FOCUSED RENDER OF MY INTERIOR SCENE